Wednesday, February 8, 2012

Be Mine!

Valentine's Day is one of my favorite days of the year because it celebrate love and friendship.  So it's really important to have a special look for a special day.   I found this cute heart fabric and knew I'd have to make it into something special.


Kanani models one of my favorite Valentine's day dresses. I love the puffy sleeves and fully gathered waist.  There's even white lace edging around the sleeves and hemline. A pink flower in her hair and sparkly red "Dorthy" shoes finish the ensemble.


One of the things I like best about sewing is being able to create different looks.  This is a fun dress that is easy to change the look of.  I found a pretty pink satin ribbon and added it at the waist. This one simple change really added to the look of the dress.

I think Kanani looks ready for a Valentine's day party in this dress - too cute!


A fancy white apron changes the look again.  Kanani looks ready to serve an afternoon tea to all her friends!

Monday, February 6, 2012

Craft: Valentine Card Holder

I've been looking for the last couple of weeks for a cute little container for our dolls to collect Valetine's cards in, and while there are a lot of cute possibilites out there, I decided that I just didn't want to break the budget for this project.  So I decided to create some cute containers with the girls.


We started with some basic supplies, heart shaped punch, scissors, tape, a mini Dixie cup, and some mini Valentine's.  I searched the Internet and found some cute old-fashioned miniture Valentines and printed them off.

Next we cut the Valetine's into simple rows and taped them onto the Dixie cup.

This was a great project because even my six-year old could do it.


We even decided to get a little fancy and we teped some hearts behind the Valenitnes.  It look like our dolls will be ready for their school party!

Saturday, February 4, 2012

Kanani

I got Kanani for Christmas 2011. Kanani was the doll of the year for 2011.  I was very excited to get her for Christmas but I didn't take her out of the box right away because we were out of town with family. I left her in the box until after the first of January when I finally had time to get her out and look her over a bit closer.


I thought she was really pretty, but she looked a little odd to me. I just couldn't figure out what didn't look quite right on her. It wasn't until after I took a close-up picture of her that I realized her eyes were unusual.


If you look closely at Kanani's eyes, the left side is smaller than the right side. I assumed it was a manufacturing defect and called American Girl.  Since she was discontinued (it was 2012) American Girl offered to either send me a different available doll of my choice or to send Kanani to the doll hospital for a new head at no charge.  Of course I wanted Kanani and so I went with choice number two.


A representative from American Girl called me from the doll hospital and told me that Kanani had arrived, and that she did indeed see the difference between her two eyes (thank goodness, my husband thought I was crazy).  Here's what really surprised me - the lady from American Girl told me that the difference between the two eyes wasn't a defect. She told me that so many people try to copy their dolls that they make a distinct feature on each doll in order to be able to tell whether or not it's really an American Girl doll.  Kanani has a smaller left eye, while another doll has one ear that's higher on the head than the other (she didn't mention which doll that one was) etc.  She said that very few people had commented on the difference and that only collectors might actually notice the difference.  She did offer to replace the head, but since there would be no noticeable difference I decided to just keep my doll in her original condition. 


I really love Kanani's long, luxurious locks, and I've been diligently looking over my other dolls trying to figure out what the distinct feature is on each one.

Friday, February 3, 2012

Queen of Hearts

Valentine's Day is the perfect day to celebrate love and friendship.  Marie-Grace looks ready to celebrate love in this beautiful Elizabethan style dress.  The dress is made of a rich red velvet and accented by a lovely heart motif.
Marie-Grace looks even more regal when she dons her Queen of Hearts crown.

I hope Marie-Grace doesn't break too many hearts in this lovely dress!


Wednesday, February 1, 2012

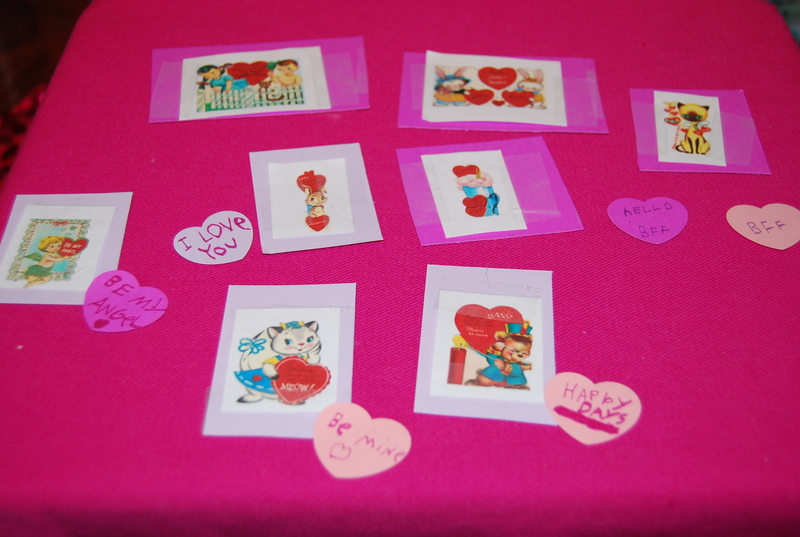
Craft: Mini Valentine's Day Cards

Do you want to make your doll some Valentine's Day cards? It's super easy to do.

We started by gathering some basic supplies: Scissors, markers, colored paper, a heart punch, tape and I searched the Internet for some images of old-fashioned Valentines and printed off the images.  We cut the old-fashioned Valentines apart and they were done!

We also made some fancier Valentines by taping some of our cut-out images to colored paper.  We used the heart shaped punch to punch out hearts in a couple of colors and we added cute phrases to create our own conversation heart Valentines.


Monday, January 30, 2012

American Girl Reading Journal

One of my favorite things about the American Girl dolls is the fact that I can read and share their stories with my daughters. We love to read and discuss the books. I love the fact that they promote reading and history. My oldest daughter has read all the books and now her two younger sisters have started to read through the collections as well. My oldest daughter started a reading journal when she was younger, and it was so much fun to look back and see what she was thinking and feeling when she read the books so many years ago. I thought it would be a lot of fun for my two younger daughters if we created a reading journal to record their reactions to the stories so they could look back at them later, too.  Reading journals are really easy to create.


 For this project you will need a 3 ring binder, paper, markers, stickers or an old American Girl catalogue. We used a binder with a clear see-though pocket on the front so we could decorate and insert our cover.  If your binder doesn't have a see-through pocket you can decorate the binder itself (or you could even use a spiral notebook or journal).


Here's Ava's journal.


Adeline's journal.


Next decide the type of information you'd like to record about each book you read. We used the headings: title, author, number of pages, time it took to read, summary, what I liked best, questions about the book, and my thoughts and feelings.  We created a chart on the computer and printed out pages for our journal. You could also use blank or lined paper and write the headings down. 


We decided to even color code our pages for different types of books.  We decided we'd like a different color for each character, but you could also classify your books based on genre, etc.
Read and record your reactions to the book. You can make notes in your journal as you read or wait until you finish the book before you write your entry.  Feel free to personalize your journal in any way you like. 

Have fun!

Sunday, January 29, 2012

Winter Warm-Up

It's the middle of winter here in the midwest, and boy the snow is coming down.  What's a girl to do but try to keep warm.  There's nothing like a warm coat and scarf to do the job.  Here are a few of my favorite looks:


I love this little blue number on Daphne. She looks ready to head out and enjoy a day at the skating rink.


Daphne wears a handmade scarf with her coat.  I posted some basic directions for this under the craft section of my blog.


Coat number two is from the Springfield line. It's super warm and fuzzy.  Perfect for a day of window shopping.


Mia's hat completes the look.  Doesn't Daphne look great!

Friday, January 27, 2012

How to make curtains for you dollhouse

Curtains are a great dollhouse accessory because they can add color to any room and they help decorate for any occasion.

To hang curtains you will need: Command hooks, a hot glue gun and glue, a wooden dowel, and wood pegs for end caps (of course you'll need material for the curtains as well).


I used a snuggle fleece fabric to match a bedspread I made for my daughter's doll bed.


Decide how large you'd like the curtains to be. I wanted my finished project to measure 11inches across by 12 inches down.  You'll want to add 1/2 an inch to each side and 1 1/2 inches to the top of the material so you'll have enough room on the sides to create seams.


I cut my fabric 12 inches wide by 12 1/2 inches long. Next I turned over 1/2 inch on all four sides and sewed the material down in place.  Once you've created the seams, you're ready to sew the tab to insert the curtain rod in. Fold the top of the material over 1 inch and sew closely to the edge so that you'll have room for the rod.


Cut the dowel to the desired length. I cut mine 11 inches long. Insert the rod through the curtain as shown above.


I wanted my curtains to appear full, so I made two panels for each dowel. This gave my curtains a gathered look.


We decided we wanted our end caps colored, so as to make the project look a bit more finished.  I had my son color the end caps in with a magic marker (you can paint the end caps if you prefer).


Once the end caps are dry, hot glue them onto the end of the dowel.  Allow the glue to sit and cool at least an hour so the end caps don't snap off.


Position the command hooks in the desired location, and hang your curtain. Be sure to place the material of the curtain in between the hooks and the end cap outside the hook as this will ensure that your curtains and rod stay in place. Repeat as desired!


It took me under an hour to make and hang four curtain panels for this room.

Monday, January 23, 2012

Meet Samantha

Title: Meet Samantha
Author: Susan Adler
54 pages

Summary: In the book Meet Samantha we meet Samantha Parkington, a nine-year-old girl living with her Grandmother (Grandmary) in 1904.  Grandmary wants Samantha to be a proper young lady, but Samantha has a bit of an adventurous spirit and is often finding herself in trouble. Lucky for Samantha, Jessie, Grandmary's seamstress watches out for her, reminding her of her manners and patching her up.

Samantha meets Nellie, a poor girl who moves in next door to work as a maid.  Samantha can't believe Nellie had move away from her family so that she could find a job outside a factory.  Samantha really wants to help Nellie, but what can she do to help her?

To make matters worse, Samantha leans that Jessie will be leaving and not coming back.  Nellie offers to help Samantha find Jessie. Is Samantha brave enough to follow through with the plan? Will Samantha find Jessie? Why did Jessie leave? What about poor Nellie's family? Find out by reading Meet Samantha.


 Here's a fun reading activity to correlate with Meet Samantha.

Character Comparison – A Venn diagram helps you compare and contrast two different things. It’s really easy to draw a Venn diagram. I did this one on Word. I use the chart section to create the diagram and type in information.


For this model I am comparing the characters of Samantha and Nellie. I have two circles, one with each girl’s name listed. On the parts of the circle that don’t overlap, you write in qualities that only one girl has. On the parts of the circles that overlap you write in qualities they both share. This allows the reader to easily look and see what qualities the characters have in common and what qualities are unique to each character.
If you don’t have a computer, you can set up a diagram on paper – just draw two overlapping circles. A circle Venn will allow you to compare lots of different areas. Besides comparing characters in the story, you might try comparing yourself to a character, or comparing qualities from different time periods. For instance, how does 1904 compare to 2012? You could compare clothes, homes, furniture, values, problems, lifestyle, etc.

Feel free to play around with the way you draw out the comparison, besides the Venn diagram you could create a chart or grid on your own. Here’s one I did using a chart:


Daily life in 1904Common Areas in Daily LifeDaily life in 2012


Bookshelf

Welcome to the American Girl Spotlight bookshelf.  Everyone at my house loves American Girl dolls, but even more, we love to read, so we thought we'd share some of our favorite books with you. On our bookshelf you will find book reviews and activities to go along with each book.  Watch for a weekly post (a review with a different activity to go along with it).  What book would you like to see on our bookshelf?

Wednesday, January 18, 2012

Winter Scarf Project

Winter is the perfect time to get out those knitting needles and put together an easy project for your doll. One of my favorite projects this winter has been knitting a scarf for each of the dolls my little girls play with.


Daphne is modeling a blue scarf I made for my youngest daughter's doll.  If you haven't tried knitting before it's super easy to learn. There are many online sights that offer simple step by step directions. The required materials are minimal; all you'll need is a pair of knitting needles and yarn.


I've played with several different sized needles and have found that size ten works the best.  The yarn is dense enough for my tastes, yet the pattern is large enough that the project goes quickly.  I love the sugar and cream yarn; it's super soft and as you work it has a nice light peaches and cream scent to it.


For these scarves I cast on 9 stitches.  You can make the scarf thinner or thicker to fit your desired size.  I made the scarves a bit on the long side so that I'd have plenty of length to wrap around the doll or tie up in cute little knots.  These scarves range in length between 26 and 30 inches. 

The type of yarn you buy (the way the pattern and colors repeat) will determine how the completed scarf will look.  This yarn had long sets of color, so it turned out with blocks of color.  The yarn in the scarf below had a color pattern that quickly repeats so the colors seem to seamlessly flow.


This is my favorite scarf because I love the colors in this one.


Each of the scarves took me about 2 hours to complete.  It's lots of fun to work on a knitting project and see the results of your hard work.

Monday, January 16, 2012

Bedroom Makeover

We built the first phase of our dollhouse last summer and it's been a lot of fun.  We have a large bedroom for our dolls to share. For Christmas my daughter got a bed from Santa, so now we have two doll beds.  Both beds are pink (although different shades) and each came with its own bedspread and pillows.  Each girl's bed matches her personality, and the bedspreads are their favorite colors.


Adeline's bed is bright pink.


Ava's bed is blue.  But the problem is - when you step back and look at the entire bedroom, it looks a bit mismatched and unfinished.


Clearly it's time for a bedroom makeover.


The first thing I did was pick a fabric that fit with both of their color preferences.  I found this cute snuggle flannel print with a blue background and pink winter accents (perfect for January!) I made two pillows for each bed. 


Next I measured their beds and made cute bedspreads (I'll share how to do this in a future post.)


And in order to make the room look a bit more pulled together, I made matching curtains to hang over each bed (I'll share how to do this in a future post, too!)


Here's the bedroom with the matching pillows, bedspreads and curtains.  I love how this pulls the room together and makes the room look ready for a set of twins or BFFs.

A close-up of each girl's space.


Wendy and Julie hanging out in their new space!

Julie feels right at home in her new room!


This was a super easy project. It took me about three hours of total sewing time.  It was fairly inexpensive as well. The fabric was 1/2 off at the fabric store, so I purchased two yards for under $8.  I love how this brought the room together and decorated it for winter at the same time.  I've already purchased some spring fabric and plan to make another set to update the room in April.